Setting Up a Professional Display for Your Disney Card Collection

This guide covers the technical and aesthetic requirements for setting up a professional-grade display for your Disney trading card collection. You'll learn how to select appropriate housing, manage environmental factors like UV light, and organize your cards to maximize visual impact. Whether you're displaying high-value 1/1 cards or a complete set of Mickey Mouse vintage cards, the right setup ensures your collection stays safe and looks great.
How Do You Protect Cards from UV Damage?
The most effective way to protect your cards from UV damage is to use UV-resistant display cases or specialized-grade acrylic holders. Sunlight is the enemy of ink and card stock. If you leave a high-value card sitting on a shelf in direct sunlight, the colors will fade—sometimes permanently—within just a few months.
UV rays break down the chemical bonds in the ink, leading to "sun bleaching." This is especially true for certain holographic or foil-etched Disney cards that rely on specific light-reflecting properties. To avoid this, look for products that explicitly state they are UV-protected. Brands like Ultra PRO or BCW offer various ways to shield your cards, but you should always verify the UV rating of any display case you buy.
Here are a few ways to mitigate light damage:
- Use UV-Protective Sleeves: Before putting a card in a display, place it in a high-quality penny sleeve or top loader.
- Choose Opaque Backing: If you're using a binder, ensure the binder itself has a thick, non-transparent cover.
- Control the Environment: Keep your display away from windows. A room with controlled lighting is much safer than a bright living room.
If you're worried about the long-term integrity of your collection, you should also look into proper conservation techniques used by museum professionals. While you aren't building a museum, the principles of light control and temperature stability remain the same.
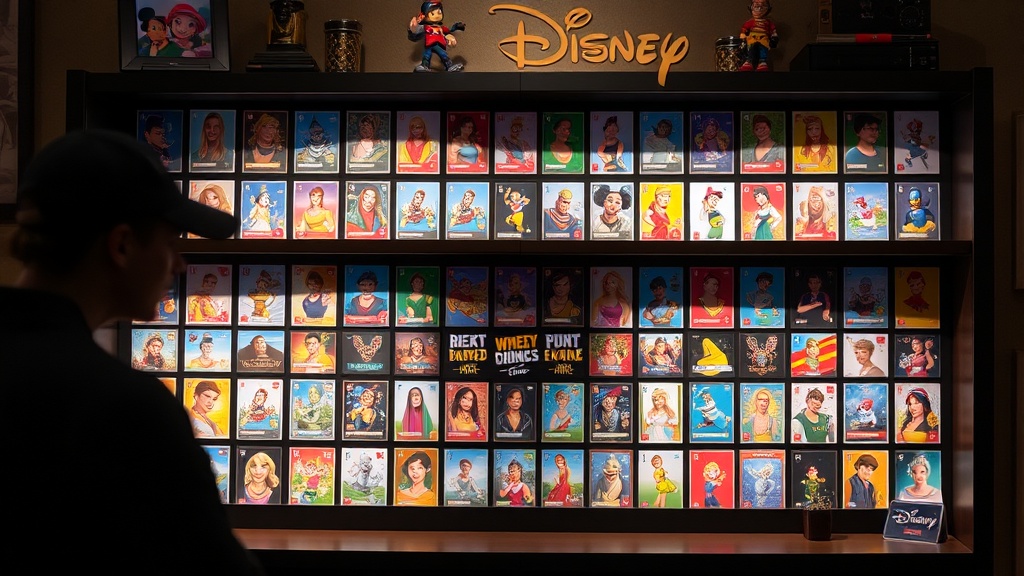
What Are the Best Display Types for Trading Cards?
The best display type depends on whether you want to showcase individual "grail" cards or an entire thematic set. Individual cards often look best in single-card magnetic one-touch holders, while large collections usually benefit from specialized binder systems or tiered shelving.
I’ve seen collectors make the mistake of buying cheap, flimsy binders that don't support the weight of the cards. This can actually bend the card stock over time. You want something with structural integrity. For a professional look, you'll want to mix and match different display methods to create depth.
Below is a comparison of common display methods to help you decide which fits your collection style:
| Display Type | Best For | Pros | Cons |
|---|---|---|---|
| Magnetic One-Touch | High-value single cards | Looks premium; highly protective | Expensive for large collections |
| Acrylic Stacks | Displaying a small group | Great for visual depth | Can be heavy and bulky |
| Wall-Mounted Shelving | Thematic collections | Saves desk space | Requires wall drilling/mounting |
| Premium Binders | Massive, high-volume sets | Easy to flip through | Harder to "display" visually |
If you're just starting out, I'd recommend a hybrid approach. Use a high-quality binder for your bulk cards and a few one-touch cases for your most prized Disney pieces. This keeps your most valuable assets secure while still allowing you to see your progress. Don't forget to check out my previous post on how to properly store and protect your Disney trading cards to ensure your display pieces are actually in good enough condition to show off.
How Much Does a Professional Display Setup Cost?
A professional display setup can cost anywhere from $50 to over $500 depending on the scale of your collection and the quality of the materials. You can start small with basic acrylic stands, but as you move into high-end magnetic cases and custom lighting, the price increases significantly.
Don't feel like you have to spend a fortune all at once. A smart way to build a display is to invest in the "housing" first—the shelves or the binder—and then slowly add high-end individual protectors as you acquire more valuable cards. It's a gradual process. (Plus, it gives you an excuse to keep hunting for those rare Disney cards!)
Here is a breakdown of estimated costs for a mid-tier setup:
- Basic Protection: $20 - $40 (Sleeves, basic top loaders, and standard binders).
- Intermediate Display: $100 - $200 (Magnetic one-touch cases, high-quality binders, and basic acrylic stands).
- Pro-Level Showcase: $500+ (Custom LED-lit shelving, UV-protected glass cases, and premium grading-ready holders).
When buying, always check the dimensions. There is nothing more frustrating than buying a beautiful display case only to find out your card—or the slab if it's graded—doesn't fit. Always measure your cards (and their protectors) before hitting "buy."
Lighting and Aesthetics
Lighting can make or break a display. If you use LED strips to illuminate your cards, make sure they are "cool" LEDs. Traditional incandescent bulbs can generate heat, and heat is a major risk factor for card warping. LED lights stay cool and won't bake your collection.
I personally love using subtle, warm-toned LED strips behind a shelf to create a "halo" effect. It makes the colors on the Disney cards pop without being overwhelming. Just be careful not to overdo it—you want the cards to be the star of the show, not the lights.
The goal of a professional display isn't just to show that you own things; it's to showcase the art and the history of the cards themselves. When you treat your collection with respect, it becomes more than just a pile of cardboard—it becomes a curated gallery. Take your time, experiment with different layouts, and most importantly, keep those cards safe from the elements.
Steps
- 1
Choose Your Medium
- 2
Evaluate Lighting Needs
- 3
Arrange by Theme or Rarity
- 4
Install Secure Mounting